
Radiant Barrier Houston keeps homes in warm climates cooler without cranking up the air conditioning. In some cases, it can even reduce cooling costs compared to thermal insulation materials.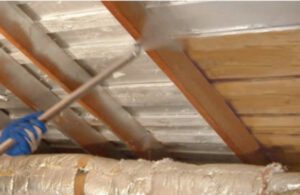
Radiant barriers are installed in attics to limit the amount of heat that reaches the living space. But they need to be installed correctly to work properly.
Radiant barriers are foil-backed insulation that is typically installed in the attic of new-construction homes. They can also be used in the attics of existing homes if the proper construction methods are followed.
Unlike conventional insulation, radiant barriers have a low emissivity factor of about 0.1. Combined with a high R-value, this allows them to effectively reflect radiant heat away from the attic space. A radiant barrier can save a home owner money in energy costs by lowering the amount of time an air conditioner must run.
The primary reason radiant barriers work is because they prevent the movement of thermal radiation that comes from the sun through the roof. Without a radiant barrier, this radiation will warm the attic and, subsequently, the living spaces below. The heat moves from room to room through convection, but with a reflective barrier installed in the attic, this radiant heat is reflected away. This keeps the attic cooler, which in turn keeps the living spaces below cooler.
A radiant barrier can even be used on buildings with metal roofs, where the conductive properties of the metal can cause it to get quite hot. It is important to note that radiant barriers will not be as effective in all locations because some building proportions increase the movement of thermal radiation, making a radiant barrier less efficient. Generally, roofs with a steeper slope, more direct sunlight, and poor ventilation will need additional insulation along with a radiant barrier to achieve optimum efficiency.
Because of their low emissivity, radiant barriers are able to reflect up to 97% of radiant heat, meaning that they have higher R-values than most attic or wall insulation types. The insulating capabilities of radiant barriers can be substantially increased if they are installed in conjunction with conventional insulation.
In order to provide a true R-value, the radiant barrier must be installed in a ventilated attic and surrounded by insulation of an appropriate R-value and cellulose density. A properly installed radiant barrier will protect the attic and the entire house from radiant heat loss, allowing a much more comfortable temperature in all rooms and savings in both heating and cooling costs.
Why do I need a radiant barrier?
The most common reason for installing a radiant barrier is to reduce cooling costs. It does this by preventing your attic from heating up, reducing the need to cool the house. However, it also increases the efficiency of your insulation. This is because, with a radiant barrier installed, the air in your attic will stay cooler, meaning that the other insulation materials in your attic can do their job of keeping the rest of your home cool.
A radiant barrier works like a reflective sunshade for your roof, directing the sun’s heat back into the atmosphere. It does not prevent heat transfer by conduction or convection, so it is often supplemented with other insulation products that do.
Different types of radiant barriers offer varying degrees of reflectivity and emissivity, as well as durability, strength, water vapor permeability, and flammability. Some are made of plastic films, while others are made of kraft paper or plywood roof sheathing with foil laminated on top. Some are even available in spray-on form. Before buying a radiant barrier, it is important to understand its specifications, as the cost can vary greatly. Radiant barriers are often offered in packages with other energy-saving features, such as blown-in insulation, to save you time and money.
When comparing prices, it is important to consider the type of attic and its existing insulation. Some radiant barriers come pre-laminated and can be simply tucked into the attic under the roof sheathing. This is the most commonly used method of installation. It is best to avoid stapling the radiant barrier directly on top of existing insulation because it may trap moisture, causing it to degrade over time.
For homes with ductwork in the attic, a radiant barrier is especially beneficial because it can help keep the ducts cool as well. This can extend the life of your ductwork and the life of your HVAC system as a whole, as well as keep you and your family comfortable all year. It is a simple and relatively inexpensive solution to reducing your summer cooling bills.
How do I install a radiant barrier?
The primary purpose of a radiant barrier is to reflect the sun’s heat away from the home, and it can be installed in a variety of ways. It can be placed under roof sheathing, draped over joists or rafters, or laid out over existing insulation on the attic floor. The latter is the most popular method, as it keeps heat out in the summer and warm air in during the winter, providing a year-round energy-saving benefit.
If you’re installing a radiant barrier in an existing home, make sure that you do not cover any ductwork and that any junction boxes, electrical wiring, or plumbing vents are exposed. Also, be sure to carefully inspect your attic for any signs of moisture that may have accumulated over time. Moisture can impact the performance of your radiant barrier, reducing its efficiency.
You’ll also want to check your attic ventilation to make sure that it’s adequate and to ensure that you don’t have any ridge or gable vents blocked with roofing materials. This will allow the attic to vent properly and will help to ensure that your radiant barrier is working as it should.
To install a radiant barrier over existing insulation, you’ll need to clear the attic, then measure and cut the foil to size, overlapping and stapling as necessary to cover the attic space. You can use a standard staple gun for this job, but it’s a good idea to test the thickness of your staples on a scrap piece of radiant barrier before using them in order to prevent jamming and incomplete penetration. Once the radiant barrier is in place, be sure to remove any loose material and re-staple any areas that have come undone. It’s also a good idea to inspect the foil regularly for any holes, punctures, or tears that should be repaired as soon as possible. This will keep the reflective surface intact and minimize the loss of heat-reflecting properties over time. Periodic inspections and timely repairs will ensure that your radiant barrier continues to provide maximum energy-saving benefits for years to come.
Which Way Should a Radiant Barrier Face?
When a radiant barrier is installed in an attic, it should be draped over the existing insulation. Some radiant barriers come with adhesive on one side to help hold them in place. When installing the adhesive side of the radiant barrier, be sure that it is pointing toward your attic floor. If you are using a non-perforated radiant barrier, it will need to be stapled to the attic floor joists over the existing insulation in order to perform well. If you are using a perforated radiant barrier, it can be placed over the attic floor insulation or over the joists. The perforations in the barrier allow water vapor to pass through the insulation, preventing condensation.
In most homes, the attic is under-insulated. This can lead to higher cooling costs during the summer. A radiant barrier can lower your energy costs by decreasing the amount of heat that travels from your roof into your home.
A radiant barrier works by reflecting the sun’s rays back into the atmosphere. It is very similar to the way a reflective sunshade on your car prevents UV radiation from warming the interior of your vehicle. A radiant barrier can also decrease the amount of heat that transfers through your attic ceiling into your home, saving you money on your electricity bill.
When choosing a radiant barrier, it is important to consider its R-value and emissivity. A radiant barrier with a high R-value and low emissivity will offer the best performance.
Some radiant barriers are made of foam or bubbles that are enveloped by two or more surfaces of foil. These materials have a higher R-value than a pure aluminized film radiant barrier, but they aren’t as effective in reducing heating costs.
When selecting a radiant barrier, make sure it meets all fire rating requirements. USI offers several different products that meet the highest fire ratings of Class A and Class 1, tested under ASTM E84 with the optional E2599 mounting method. You should also consider the permeability of the material. USI offers both breathable and non-breathable radiant barriers. It is important to use a breathable radiant barrier, especially in cold climates, in order to avoid condensation and moisture problems. In addition, it is important to inspect your insulation at regular intervals. These inspections can assist you in identifying and repairing any moisture issues that may be present.