Costs of Stucco Repair

Stucco Repair

Stucco Repair Philadelphia is a fairly expensive project if extensive damage has occurred. The exact costs will vary depending on the extent of the work and materials needed.Stucco Repair

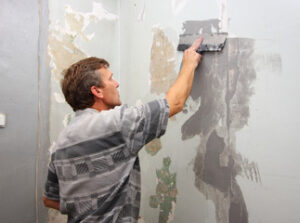
Use a hammer and cold chisel to chip away loose stucco. Protect yourself with safety goggles and heavy gloves. Cut away the rusting metal lath and torn house wrap around the damaged area.

Stucco is a durable material that has been used for thousands of years to add beauty, insulation, and longevity to building structures. However, it is not immune to defects. Cracks are a natural part of the lifespan of any exterior wall and should be addressed as soon as possible to minimize the potential damage.

The first thing to do when dealing with cracks is to chip away any loose pieces of stucco and remove dirt and algae from the area. Make sure to wear work gloves and safety glasses to protect yourself from flying debris when doing this step.

When applying the caulking, use a trowel to match the texture and appearance of the surrounding stucco. This will ensure a smooth blend and allow the caulking to expand or contract with temperature changes without further cracking. After the caulk has cured, paint it with a water-based paint to complete the repair. It is important to note that when you touch the repaired crack, it will still feel flexible. This is normal and attests to the strength of the caulk. If it feels stiff or rigid, this may indicate that the underlying problem is more severe and needs to be looked at further.

Stucco cracks are natural and will happen with time, especially in older homes. It is essential to do a yearly inspection to catch any defects early on and take corrective action as needed. However, improper repairs can exacerbate the rate of cracking and lead to more serious structural issues. It is essential to use only approved products and methods during the repair process. If you do not do this, you will find that the crack will open up again quickly, which can also exacerbate the growth of mold.

Holes

Holes in stucco are an easy fix and should be repaired immediately to prevent further damage. Most of the time, they are caused by water or moisture that has penetrated the stucco and the protective layer of tar paper. Moisture is very dangerous to a stucco wall and should be prevented at all costs, especially in cold-climate areas. If moisture gets trapped in a wall, it can lead to structural issues that will be costly to repair.

In addition to a hammer and chisel, the most important tool you will need for this job is a wire brush. This tool can be used to clean the hole and the surrounding area. Make sure you brush the entire area, including around the edges of the hole, to ensure that there is no dirt or debris lodged inside the holes.

Once the area has been cleaned, you will need to apply high-quality caulking around the hole to create a seal and prevent moisture from penetrating the hole again. Once the caulking has cured, you can then proceed to apply a small amount of stucco patch material to the hole. This can be either a pre-mixed compound or sanded stucco. It is very important to use a material that contains acrylic additives. This will help the patch material react with the surrounding expansion and contraction of the stucco.

If you are able to, use a rubber float to smooth out the patch and blend it with the existing texture. Once the stucco patch dries, you can paint it a color that matches the surrounding walls.

If the hole is a result of poor construction, you may need to replace the damaged section of your wall. This is especially true if the hole was caused by an impact. This is because the force of the impact can cause the structural framing to weaken, leading to future cracks and holes in your stucco. If you suspect that your stucco is not in good condition, contact a professional contractor to discuss the best solution for your home.

Peeling Paint

If your stucco is peeling, it is usually a sign that the surface of the wall has lost its bond with either the underlayers or lath. This can occur when the weather is cold and damp or when there are problems with the mortar mix. Either way, it is not good for the structure of your home and should be fixed immediately.

It is important to understand that while it is possible to repair small hairline cracks in stucco yourself, if you are not sure what caused the problem, it may be more serious than you think and should be left to a professional. In some cases, such as spider cracking (where the base coat under the top coat did not cure properly), it is probably necessary to completely reapply the stucco.

The first step in repairing peeling paint is to remove any loose pieces of stucco that are coming off. This is usually not difficult, but if the peeling has gotten severe, you may need to use a wire brush to loosen any remaining dirt. It is also a good idea to clean the entire area that is being repaired with a pressure washer to ensure that any remaining dirt or mildew is removed.

Once the area has been cleaned, a pre-mixed stucco patch can be troweled over the damaged surface. It is best to follow the instructions on the package carefully to ensure that you don’t mix up any ingredients accidentally. The patching product should be applied as thinly as possible to avoid any unsightly lines in the finished wall. It is also a good idea to add some pigment to the stucco mix in order to match it to the existing color of the wall.

Once the patch has dried, it should be sanded down with a sanding block to ensure that the new material is smooth. A textured coating can be added at this point, if desired. It is best to wait for the patch to fully dry before painting, as paint will not adhere well to wet stucco.

Water Damage

When water gets into a wall, it can soak insulation, cause mold, or lead to wood rot. This is why it is important to inspect your stucco regularly and have any leaks or water penetrations repaired as soon as possible.

Look for cracks around windows or other fixtures, as well as any discoloration that could indicate rotting wood behind the stucco. You may also want to inspect for stains or bubbles near the bottom edges of your walls, as water tends to flow down and cause damage there.

If you notice water intrusion into your stucco, it is a good idea to call in the professionals for a full inspection and repair. This will usually involve removing any damaged sections of stucco, inspecting and cleaning any mold or wood rot, installing a new drainage plane material to prevent more water intrusion, adding a vapor barrier, modifying weep screeds, or patching the area.

Stucco is an excellent choice for homes in coastal areas, as it resists saltwater corrosion much better than other materials. However, even in a mild climate, water intrusion into the wall can be a major problem. There are several factors that can cause this, including salt water or wind-driven rain, improper flashing, expansion or contraction of the stucco, and the growth of vegetation or plants on the surface of the home.

It is also very important to check the caulking around doors and windows, as this will seal against moisture penetration and leaks. If you find that the caulking is cracked or missing, it will need to be replaced before any stucco work can take place.

If the water damage is severe, it will require more extensive work to correct it. Stucco remediation will be required, which means removing the existing stucco, repairing or replacing any rotted sheathing or framing, and then rebuilding the system, starting with a proper WRB and progressing outward in either masonry or EIFS.

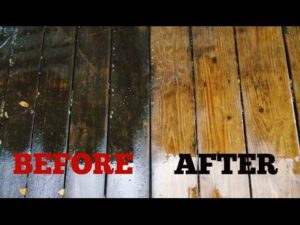
It is important to keep in mind that stucco can be beautiful and that water damage can sometimes occur without any real issue. However, if it goes untreated for too long, it can start to create major problems and impact the value of your home. Stucco repair can be relatively inexpensive and easy to do if you catch the problems before they get too bad.

How to Clean Wood for Staining

deck cleaning

When it comes to cleaning wood for staining, it’s a good idea to start with a fresh, clean surface. Sweep away loose debris with a broom, then spray the deck surface with a cleaner and allow it to soak for the recommended time frame.deck cleaning

This cleaner is an EPA Safer Choice and is less toxic than bleach-based products. It also repels dirt and stains, so the deck doesn’t need as much maintenance. However, if you need some professional help, you can contact Pro Deck Builders Charleston.

The first step is to remove any debris that has accumulated on the deck surface. This can include leaves, pine needles, and dirt. A simple broom or leaf blower can help clear the surface, while a putty knife can be used to get in between the boards and any nooks and crannies where debris can collect.

A garden hose with a spray nozzle will be useful to evenly disperse the cleaning solution on the surface. The spray also helps to loosen any dirt and grime that has collected on the wood.

Next, a deck cleaner that is formulated for the type of decking, whether wood or composite, should be applied. Some are available in pre-mixed formulas, while others must be diluted with water. If you are using a dilution, make sure to follow the manufacturer’s instructions to avoid damaging the surface.

Some deck cleaners contain mildewcide, which prevents the growth of future mold and mildew. If you are treating a specific problem area, a stronger scrub brush may be needed to remove the mildew stains.

Vinegar, whether diluted or not, is a common household cleaning agent that works well on many surfaces. However, if it is allowed to soak into the deck or is left on too long, it will cause the wood to leach, which can damage and weaken the structure.

If you want to use a natural cleaning product, try a mix of baking soda and vinegar or distilled white vinegar. Vinegar is a strong deodorizer and can even be effective in removing ants. Baking soda, on the other hand, is a gentler alternative that can be used to clean many different surfaces and is especially good for scrubbing greasy or sticky areas.

Pre-Rinse

A deck needs more than a broom and a dustpan to look its best. Summer hot dogs, fall leaves, harsh winter weather, and general wear and tear take a toll on natural wood or composite decking. It’s time for a deep clean before you put your deck back to use.

Before you apply a cleaning solution, spritz the deck with water to soften the dried cellulose fibers that hold dirt and mildew. This pre-rinse will also allow the cleaner to be dispersed more easily. A superfine sprayer attachment on a garden hose works well.

Start by applying a wood brightener that’s formulated for your deck’s type of wood. Many of these products include a detergent, bleach, and a chemical that reacts with the specific woods to remove stains and brighten the deck’s appearance. Read the product’s label and follow the manufacturer’s directions for application.

A few squirts of a deck cleaner will help with dirt and mildew removal, but you may need a stronger product to get rid of particularly stubborn problems. Bleach—especially chlorine bleach—will whiten the deck unnaturally, corrode metal elements, and harm plant life. Look for a non-chlorine bleach that contains oxygen, which will kill mold and algae and remove stains.

After you’ve scrubbed and rinsed, let the deck dry thoroughly. Ideally, you want to wait 48 hours before you walk on it and until it’s dry enough to feel without a splinter between your feet.

While you wait, check for loose screws or nails in the ledger board, rails, and joists. Tighten or replace as necessary. Also look for areas where the deck boards are separating at the seams. If you have a lot of these areas, it’s likely the deck is sagging and will need to be sanded or replaced.

Scrub

Before you apply any cleaner, rinse your deck with a garden hose to get rid of any dirt and debris stuck to it. This helps the cleaner disperse and work more effectively. It also protects plants that are close by from the harsh chemicals in some cleaning products.

Chlorine bleach-containing cleaners are not recommended for cleaning treated wood, such as that used on a deck, because they can damage it and leave it with an unnatural whitewashed look. They may also raise the grain of the wood, causing it to become rougher and more likely to attract mildew. Chlorine bleach-containing cleaners can also corrode metal fasteners and screws, which may cause them to loosen or even rust. Additionally, it can discolor wood and break down in sunlight, which can cause the surface to fade over time.

A safer alternative to chlorine bleach is oxygen bleach. This product is available as a liquid or as a powder, and it works well to remove oil and grease stains as well as mildew stains. This cleaner is gentle enough to use on stained decks and will not harm nearby landscaping or pets if you are careful. For tough stains, you can add powdered borax to the oxygen bleach solution and scrub thoroughly before rinsing.

Always follow the instructions on the label of the cleaner you choose. Work in sections, and make sure to allow the cleaning solution to set for the amount of time suggested by the manufacturer. Once the time is up, use a hard-bristled broom with synthetic bristles to scrub the area. If needed, sand the area with a sander to help smooth it out.

Apply the cleaner.

The best cleaners remove a wide range of grime, from dirt and mildew to fungus. Some are biodegradable, which helps protect the environment from toxins seeping into lawns and other plant areas. Others are formulated to leave behind a protective coating that discourages future mildew and mold growth.

A sprayer or mop works best for applying the cleaner. For tough spots, you can also use a scrub brush. Regardless of the method, wear rubber gloves to protect your skin and eyes from splashes. Some cleaners contain bleach or oxidizing agents that can cause irritation, so always follow the manufacturer’s instructions for wearing eye protection and gloves.

If your deck has dark stains that don’t fade even after cleaning, consider buying a product designed to lighten wood and brighten fading stains. Also known as restorative cleaners, these products typically feature oxygenated ingredients such as sodium percarbonate that work like bleach but are safer for wood than oxalic acid. Some of these cleaners are also designed to be used before staining to help the new coat of stain take on a more uniform color, which is important for making sure that your deck looks good and lasts long after it’s stained.

Another option is a pre-mixed solution, such as the one from Simple Green Oxy Solve Total. This ready-to-use cleaner doesn’t need to be mixed or diluted, which makes it more convenient than some other options. This cleaner is certified as a U.S. EPA Safer Choice cleaner, which means that it’s safe to use around people, plants, pets, wildlife, and waterways, unlike some other options. It’s also very effective at removing a variety of contaminants, including black algae, mold, and mildew.

Let it dry.

As soon as the deck is clean, it must be allowed to dry thoroughly. This will ensure that the new stain is properly absorbed and won’t be flaked off by moisture, as can happen if you apply a water-based stain to a damp deck. A light sweeping (daily, ideally) will quickly remove twigs, dirt, and other natural debris from the surface, but if your deck is especially large or heavily stained, you may want to consider investing in a cordless blower that makes quick work of twigs and other debris and allows you to reach high areas without a ladder. A few brands of these are available that do a good job and are safe for use on wood surfaces.

After the deck is fully dry, you can replace any softly rotting boards and stain the deck. Staining isn’t a simple process, but it isn’t difficult either. Before you begin, make sure that the weather is good and that you have the time to dedicate to the project. It is best to avoid staining on a windy day. One gust could send splatters of your stain all over windows, siding, and nearby plants. Cover any shrubbery with tarps or plastic drop cloths to prevent damage from overspray.

There are many different wood cleaners available to purchase or make at home, but a few are essential to the staining process. A TSP substitute will quickly remove most stains and is safe for use on all types of wood. Oxalic acid wood cleaner can also remove tannin stains and iron stains, which are common on redwood and cedar decks. However, it is not as effective against mildew or other organic stains. Be sure to read and follow all product directions carefully, and always wear rubber gloves when mixing or applying the cleaners, as many contain ingredients that can irritate skin.