Hardwood Floor Refinishing

flooring

flooringRefinishing is the way to go if your hardwood floors have major scratches and gouges. This is a more involved process than resurfacing, which involves removing and replacing planks, grinding the floor to even it out, and re-staining the entire surface of your flooring. It is also possible to screen and recoat your hardwood floors, which skips the sanding step and only requires a new protective finish coat.

Hardwood Floor Refinishing Bergen County NJ is an excellent option to spruce up them. It can make a huge difference in the look of your home and add value to it. This process involves removing the old finish from the wood and then staining it again, creating a new color and look for your floors. It can also help remove stains that have developed over time. Having beautiful hardwood floors is something that every homeowner should strive for. However, stains are inevitable and often difficult to get rid of completely. Refinishing can eliminate most stains and leave your floors looking great again.

Before beginning the refinishing process, it’s important to prepare the room in which you will be working. This should include clearing the area of all furniture, walls hangings and window treatments. It’s also a good idea to clean the wood floor thoroughly before refinishing. This will ensure that there is no dust or dirt that can interfere with the final result. Vacuuming is a good place to start, and then you can use a microfiber cloth or tack towel to remove any remaining dust.

During the sanding process, it’s essential to follow proper safety protocol when using a drum sander. It’s recommended that you wear a mask and goggles to protect yourself from the fine dust particles. In addition, you should always vacuum the sanding dust as it accumulates to prevent it from becoming airborne.

The process of sanding usually takes several rounds, with each round using a finer level of sandpaper than the last. It can take at least four passes with a finer grit to fully refinish most older wood floors. It’s also important to note that sanding can damage the surface of your wood floors if it’s done improperly. Therefore, it’s crucial to hire a professional who has the equipment and experience to do the job correctly.

After sanding, it’s important to clean the wood floors again and wipe them down with a damp cloth or tack cloth to remove any dust left behind. Taking care to do this will ensure that there is no residue left on the surface of the hardwood, which could cause the final coat of stain or polyurethane to discolor.

Staining

A stain is the coloring agent that will give your hardwood floors the color you want them to have. Staining is not to be confused with finish, which is designed as a protective coating that adds no color to the wood. Staining is a much more complicated process that can be difficult to get right, especially in large areas with lots of color options.

When choosing a stain, it is important to test the product on an inconspicuous area of the floor before applying it. This will ensure that you like the color and that it will work with your home’s decor. A professional flooring expert can help you select the perfect stain for your floors and provide recommendations based on your specific wood type.

The first step in staining is to sand the existing surface of your hardwood floors. This can take between two and four days depending on the size of the room and condition of the floors. Once the sanding is complete, it’s time to stain your new hardwood floors.

Before staining, your floors should be clean and free of dust. It is also recommended to cover your furniture with a tarp, or move it out of the room to protect it from accidental spills and smudges. Ideally, you should allow the room to air out completely before moving back in and refinishing your floors.

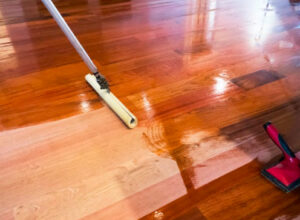
Once the stain is dry, a protective finish can be applied. This can be varnish, polyurethane or another protective hardwood floor coating. It is important to apply a topcoat sealer that is compatible with the type of stain you choose, as it will prevent scratches and moisture damage.

While some people prefer the look of dark stained wood, many homeowners find that a light-colored stain makes it easier to spot dirt, debris and high-traffic wear, making cleaning and maintenance less labor intensive. If you’re concerned about the time commitment of maintaining a dark stain, consider asking your floor professional to put some larger sample stain samples directly on your floor after they are done sanding it (or make you some portable samples that you can take with you). This will let you see exactly how the finished product is going to look in your room and ensure that you’re happy with the results.

Polyurethane

Polyurethane is a type of reaction polymer, consisting of two components: a polyol resin and an isocyanate hardener. When applied as a top coat, it protects hardwood floors by sealing them against moisture and imbuing them with durability. It is a good choice for flooring as it is easy to apply and provides resistance against household cleaners, water, abrasion, heat and chemicals.

Polyurethane also provides a smooth, glossy finish, which is great for those who want their floors to shine. A glossier coating also holds up better against scratches and is more resistant to wear than matte finishes. It is a good idea to test your floor’s suitability for a polyurethane coating before you commit to having it refinished. This is particularly important if your floor will be exposed to household cleaners as over time they will imbue the surface of the wood with their odors. A test area such as an exposed corner or under a window will let you know how well your floor holds up to the cleaners that you use.

When it comes to choosing a polyurethane, there are two options: oil-based and water-based. Oil-based products are typically less expensive than their water-based counterparts, but they can be more difficult to work with as they dry quickly and leave behind a sticky residue that is a pain to remove.

A good refinisher will have experience with both types of finishes and can help you determine which is best for your home. They will be able to guide you through the process of choosing a stain, sanding and applying a polyurethane coating. They will know how many coats are needed to achieve your desired results and how to avoid common mistakes like orange peeling, lap marks and brush strokes.

As with all finishes, drying/curing times will vary depending on the brand you choose, room temperature and humidity, air flow, whether or not you add a retarder and other factors outside of your control. However, when you consider how much faster a refinisher can complete the process of redoing your hardwood floors and the benefits that it will bring to your home, it is well worth the investment!

Sealing

Hardwood floors are not indestructible, and over time they will show signs of wear and tear. Scratches, dents and discoloration can occur, and these signs can be indicators that it’s time to refinish or reseal your hardwood floors.

The process of refinishing or resealing is an important one that helps maintain the longevity and beauty of your hardwood flooring. While many people rely on a professional to take care of this task, it is possible for homeowners to complete the job themselves. However, it is important to understand that this can be a messy and time-consuming project, especially if the wood has been stained.

Before beginning this process, it is a good idea to consult an NWFA (National Wood Flooring Association) certified flooring expert. These professionals have taken an extensive test to earn this title, and they can help you determine the best way to refinish or reseal hardwood floors. They can also give you a more precise estimate on how long the process will take and what it will cost.

The first step in refinishing or resealing your hardwood floors is to lightly sand them once again. This can be done by hand, but it is much easier and faster to use a large rotary sander. This will help create a smooth surface for the next layer of finish to adhere to. After sanding, it is very important to thoroughly vacuum the entire floor to remove all dust and debris. It’s recommended to wear breathing protection during this process, as sanding produces a large amount of dust that can be harmful to your health.

After sanding, the next step is to apply a coat of sealer. This will protect the wood from dirt and moisture, which can damage or cause the color of the hardwood to fade over time. It is a good idea to consider using an environmentally friendly water-based polyurethane, as it takes less time to dry and produces fewer volatile organic compounds (VOCs) than oil-based products.

Once the sealant is applied, it is very important to let it dry completely before proceeding to the staining or refinishing process. This can take a few days, depending on the weather conditions in your area.

Masonry: A Unique Construction Method

Masonry

Colorado Springs Masonry are the unique construction method that creates durable, energy-efficient, and fire-resistant buildings. It is also a valuable tool for those in the construction industry to have in their arsenal, as it allows them to offer diverse materials and produce sturdy buildings that can withstand severe weather conditions.Masonry

Masonry is a building trade that combines stone, brick, and mortar to create structures. It is a durable building material that can be used for both interior and exterior walls and paving. Brick is available in a variety of shapes, sizes, and colors to suit a specific design. It also offers a good sound barrier, which is ideal for homes and offices located near train tracks or busy highways. Masonry is also a non-combustible material, which can help protect the structure from fire.

The earliest masonry was built using stones, which are a natural material that can be shaped into walkways and walls. Later, people discovered that clay could be blended into a stackable unit, and mortar was created to speed and ease the construction process. Today, brick is one of the most popular masonry materials.

There are three main types of brick: molded, pressed, and sun-dried. Molded brick is formed by molding soft, wet clay in a mold. The bricks are then dried, either in the sun or by using waste heat from the kiln. The resulting bricks have a regular shape and sharp edges. The molded bricks can also be “frogged,” which means that they have indentations on one of the longer faces. This is used for decorative effects and to increase strength.

Pressed brick is a variation of molded brick that is produced by pressing it against a die at high pressure. The result is a brick with a more uniform shape, but it has less strength than a molded brick. Sun-dried brick is similar to pressed brick, but it is not fired in a kiln. The bricks are dried using the sun’s heat, which results in a much less consistent shape and weaker strength.

Another type of masonry is called calcium-silicate brick, which is made by binding lime with siliceous materials such as sand, crushed flint, or quartz, together with mineral colorants. It is a good alternative to clay brick because it has a higher thermal mass and is less porous than other masonry materials. It can also resist corrosion and chemical attacks.

Stone

Stones are an important element in masonry construction and come in different shapes and sizes. They can be used in a wide variety of applications, including foundation work, road beds, railway ballast, and doorsills. They are a common feature on the facades of buildings and also make excellent decorative elements. Some stones are polished and used as a facing material for walls or roofs, while others are carved to create intricate designs.

The process of constructing a building with stones can take more time than with other materials. This is because masonry teams must wait for the appropriate weather conditions before they can continue working on the project. This can delay the completion of the building, which is especially a problem when the weather is unfavorable. To mitigate this, it’s important to set up processes for being productive on-site when the weather is favorable.

Construction with stone is an ancient practice that began when humans started constructing homes and other buildings from rocks. These structures were often built from the materials available locally. Some of the earliest examples include the round stone huts found on the Aran Islands and the elaborate pyramids of Egypt. Since then, stone has become the primary construction material for many building projects due to its strength and beauty.

Masonry is the art of constructing with stone, brick, or concrete blocks. It requires the use of hand-held and power tools to shape and dress stone. These tools range from hammers, mallets, chisels, and gouges to frame and circular saws. It is important to use the proper tools and equipment for each job to ensure that the finished product is strong and durable.

The different types of stone used in masonry are granite, limestone, and sandstone (igneous), slate and marble (sedimentary), and gneiss (metamorphic). Different kinds of stone require different techniques for construction.

For example, ashlar is a fine type of stone that requires extreme care when setting. The stones must be thoroughly cleaned, the bed surface wetted, and the mortar evenly spread over the stones and joints. The mason must carefully select the stones to be positioned in order to avoid gaps between the adjacent courses. It is also crucial to use large stones for headers and jambs and to provide through stones at intervals to increase the strength of the wall. The joints should be tampeted and pointed before the mortar sets to prevent loosening of the stones.

Concrete Blocks

Concrete blocks are a common construction material that is often used to build walls and other structures. The blocks are usually hollow on one side, and they can either be solid or have a design on them. They are also sometimes referred to as CMU (concrete masonry units). Some blocks have different finishes on their surfaces, and they can be used in various applications.

A concrete block can be made with a variety of ingredients, including cement, aggregate, and water. The blocks are then put in a large oven that is heated to a high temperature until they harden. This process takes about a day to complete. The blocks are then cooled and transported to the building site.

The blocks can be made in a number of sizes and shapes, and they can be designed to fit many different applications. They are also commonly used for landscaping projects, such as paving walkways or adding decorative elements to garden areas. They are also useful in creating non-load-bearing wall systems for fencing and other structures.

When making these blocks, cement is mixed with aggregate and water. A chemical additive, called admixture, is added to the mixture to change the properties of the final product. This is done to improve the strength, durability, and workability of the blocks. The blocks can be made in a variety of different colors by using dyes and pigments in the cement mixture.

Solid concrete blocks are also known as “cinder blocks,” although the term has become misleading in recent years. During the early years of concrete block production, producers began to add cinders to the mix in order to reduce the weight of the units and make them easier for masons to handle. While this was a common practice in the industry, codes and standards have now been established that comprehensively address the minimum physical requirements for all concrete masonry units.

In addition to being easy to handle, concrete blocks are also very durable and have a high level of fire resistance. They are also water-resistant and able to insulate against both sound and temperature. These are all important considerations when choosing the right block for your project.

Mortar

Mortar is a strong binding material used to close the gaps between bricks or other blocks that are used in construction. It is traditionally made from a combination of Portland cement, hydrated lime, and sand. This mix is what bricklayers use to “bed” masonry units such as concrete block, brick, and stone. It is important that mortar is made correctly, as it can help strengthen a structure and protect the bricks from moisture. Mortar is typically made on site, although pre-mixed mortar has become more common these days.

Generally, mortar is prepared on the spot by mixing a required quantity of water with a mixture of binding materials like cement or lime and fine aggregates like sand. However, ready-mixed mortar possesses admixtures for set-control and may be utilized in construction for periods up to 2.5 hours after primary blending.

Lime mortar is a mix of lime and sand with a small amount of clay, which can be added to give it more strength and flexibility. It is used to bind the masonry bricks together and to plaster the surfaces of a masonry structure. It is also commonly used to repoint a masonry wall.

Cement mortar is a stronger and more durable version of lime mortar. It is made by combining Portland cement with sand and fine aggregates such as limestone or siliceous sand. This mix is then mixed with water to create a paste that can be applied to a masonry surface to bond the bricks together and provide a smooth finish.

There are several types of cement mortar, and each type is intended for a specific application. The type of mortar you choose should be based on the strength and durability requirements of your project. For example, the M-type mortar has a higher compressive strength and is designed for exterior use, while the N-type mortar has low shrinkage and is ideal for interior use.

To ensure that your mortar is prepared properly, it’s important to make sure the area you’re working on is wet before applying the mortar. This will prevent the mortar from sticking to dry areas of your wall, which can lead to cracks or other structural problems. You can wet the surface by spraying it with water, being careful not to saturate it.

How to Start a Fence Company

Fence Company

Before hiring a fence company, it’s important to learn as much as you can about the company’s background and reputation. The first place to look is the Better Business Bureau. The BBB’s website contains customer reviews that help you evaluate companies based on past performance. The site also calculates an overall score based on history. If the company is relatively new, you might not find many reviews. If that’s the case, ask for references from local customers.Fence Company

There are many costs associated with operating Fence Company. Aside from the basic equipment needed to complete fence installations, owners must also hire staff to manage the business. This may include permanent employees or contract workers. Depending on the size of the company, employees may include fence technicians, installers, masons, and other professionals. The business will also need office space, email, and software for accounting and billing. A website is also required.

Insurance is another cost associated with operating a fence company. Insurance covers accidents that occur while installing or repairing fences. In addition, a business license or contractor’s license is required. For large projects, surety bonds may be required. A small business insurance policy will cost between $500 and $900 annually. Additionally, a full-size truck with an extended bed and a forklift may be necessary.

Other costs associated with operating a fence company include the tools and materials required to complete installation projects. The most common materials used for fence installation include redwood, cedar, and bamboo. Additionally, pressure-treated timbers increase the durability of the wood and are resistant to insect damage. However, the cost of operating a fence company will depend on the number of materials used.

A fence company may also require office and storage space. For small businesses, it can be beneficial to use a house that serves several purposes. Vehicle upkeep and office supplies are also common costs. Additionally, a fence company may need to purchase wholesale materials to meet its fencing needs. In addition, it must also hire a registered agent to maintain a business identity. Some companies offer free registration as part of their service.

Another cost associated with fence companies is the cost of marketing. Most reputable fence companies have an office, warehouse, or storefront. This is essential for a successful company. This office also allows you to network within the community. You can also leave business cards at homeowner’s associations and realtors’ offices. Furthermore, farms and ranches frequently require fence repair.

When it comes to marketing, a fence company should advertise various types of fencing. Advertising is crucial for getting new customers. A good website is a must-have for a fence company. It should also feature social media accounts and mobile-friendly sites.

Before starting a fence company, it is important to understand the state and local regulations that will govern your business. For instance, many states require fence contractors to obtain a general business license. Additionally, they may require an OSHA certification and bond. The laws regarding these requirements differ by state, but you should check with your local government to learn more.

If you are a sole proprietor, it is also wise to form a business entity as a DBA, which stands for Doing Business As. Other business structures include a corporation, limited liability company, or partnership. Forming a legal business entity will protect you from personal liability and help protect your business from being sued. You can create an LLC by yourself, or you can use an LLC formation service.

To increase your chance of success, you should advertise in local publications and at networking events. You can also consider joining your local chamber of commerce. By doing so, you can network with other business owners and develop your reputation. You may also want to join trade organizations and farming cooperatives.

When choosing a fence company, it is important to consider the quality of their work. A reputable company should have a good rating on review sites and be willing to display its previous projects. It is easy to find reviews and contact information about reputable companies. In contrast, unlicensed contractors are harder to research.

In addition to business and contractor licenses, fence companies should also obtain liability insurance. This is important to protect them in the event of an accident and to compensate for any damage. Additionally, surety bonds can cover up to $50,000 and are required for larger projects. Insurance premiums vary widely but can average between $500 and $900 per year.